ការទាញយកបន្តុំអក្សរដែលនៅផ្នែកខាងមុខ ឬផ្នែកខាងក្រោយ នៅក្នុង Field Calculator ដោយប្រើប្រាស់ Python

ទិន្នន័យមួយចំនួននៃប្រព័ន្ធព័ត៌មានភូមិសាស្ត្រ ត្រូវបានបញ្ជូលជាទម្រង់អក្សរដោយបានប្រើប្រាស់ “ ” ; “ - ”  ឬ “ _ ”។ល។ 
ជាឧទាហរណ៍ខាងក្រោម៖
យើងមានទិន្នន័យ ដែលនៅក្នុង Field នៃ PORT_NAME មានទម្រង់ឈ្មោះនៃវែង ហើយ
ឈ្មោះ​​ នោះមានប្រើ ចន្លោះ (Space) នៅលើឈ្មោះទាំងនោះ។
តើធ្វើយ៉ាងដូចម្តេច ដើម្បីទាញយក ឈ្មោះនៃផ្នែកមួយ មកដាក់ក្នុង Field ថ្មីបាន?
ដំណោះស្រាយ
ជំហានទី ១៖ បង្កើត Field Name មួយថ្មី
១. ចុច Mouse ខាងស្តាំលើ Layer រូចចុចលើ Open Attribute Table
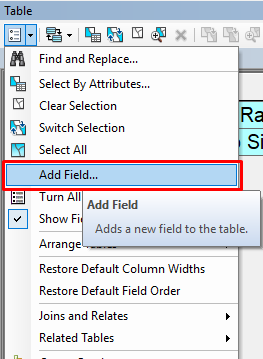
២. ចុចលើ Icon នៃ Table Options
៣. ចុចលើ Add Field… ដើម្បីបង្កើត Field ថ្មីមួយ
៤. បំពេញនៅប្រអប់ដែលបានលោតចេញមក
- Name ត្រូវបំពេញឈ្មោះនៅក្នុងប្រអប់ ដោយមិនត្រូវមានឈ្មោះ “ ” និងចំនួនអក្សរច្រើន ជាង ១០ទេ ។
- Type ត្រូវប្តូរវាទៅជា Text ព្រោះទិន្នន័យនោះគឺជាអក្សរ

៥. រួចចុច “OK” ដើម្បីបញ្ចប់លទ្ធផលទទួលបាន

ជំហានទី ២ ៖ ប្រើប្រាស់ Field Calculator ដើម្បីគណនា
៦. ចុច Mouse ស្តាំ​ននោះលើ Field “splite_nam” រួចចុចលើ “Field Calculator”
 
៧. នៅលើ Parser ចុចលើ “Python”  និង Type ចុចលើ “String”
៨.​ នៅក្នុង Field Caculation Workbox, យើងត្រូវសរសេរ Python មួយជួរ ដូចខាងក្រោម៖
!PORT_NAME!.split(" ")[0]
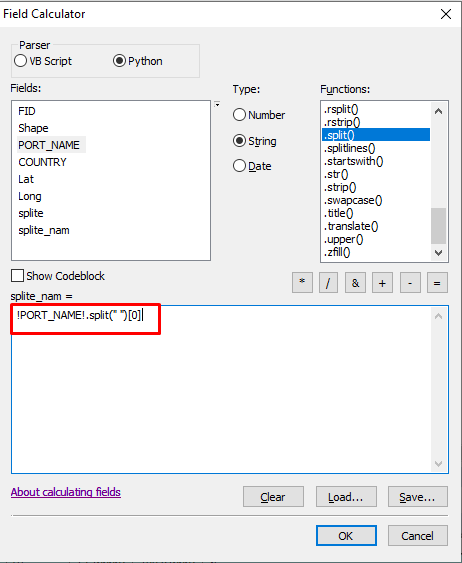
ចំណាំ៖ 
  • !PORT_NAME! ៖ គឺជា Field ដែលយើងត្រូវយកមកសម្រាប់ក្នុងការគណនា។
  • .split() ៖ គឺជា Function ធ្វើការបំបែកបន្តុំតួរអក្សរ។
  • “ ” ៖ គឺជា កន្លែងសម្រាប់ដាក់សញ្ញាសំគាល់ សម្រាប់បំបែកបន្តុំអក្សរ ក្នុងចន្លោះយើងអាចផ្លាស់ប្តូរបាន​​ សញ្ញាសំគាល់បានដូចជា “.” : “_” ;“-” ... ។ ដោយនៅក្នុងបន្តុំអក្សរនៃ Field ខាងលើ 
  • “Si Racha Terminal” បន្តំអក្សរប្រើប្រាស់ “ដក់ឃ្លា” ដូច្នេះ នៅក្នុង Python Code ខាងលើ យើងបានប្រើប្រាស់ “ដកឃ្លា”។ 
  • [0] ៖ គឺជា តួរលេខនៃបណ្តុំអក្សរ ដែលចាប់ផ្តើមពី 0 ទៅ និង រាប់ឆ្វេងទៅស្តាំ។

 
៩. បន្តាប់មក ចុចលើ “Okay”។ យើងនឹងទទួលលទ្ធផលដូចខាងក្រោម៖


របៀបង្កើតចំនួនស្វីត(តាមលំដាប់) ដោយប្រើប្រាស់ Python នៅក្នុង Field Calculator

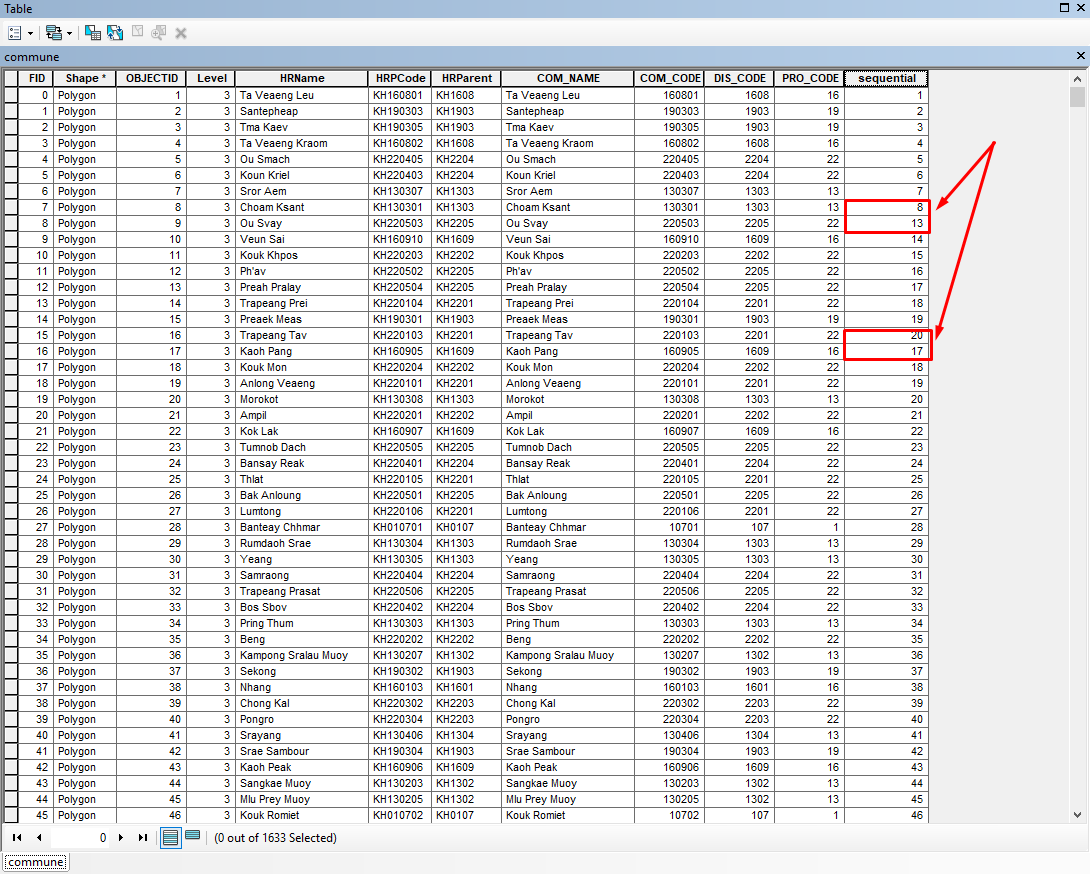
យើងមានទិន្នន័យមួយ ដែលមានមិនមានលេខលំដាប់ត្រឹមត្រូវ ឫក៏ទិន្នន័យនោះបានបាត់
លេខរៀងមួយចំនួន ដូចទៅនឹងឧទាហរណ៍ខាងក្រោម៖

ចំនូនខាងលើគួរតែជាលេខលំដាប់ដោយ 8,9,10,11,12,13,14,15,16,17។
តើយើងត្រូវធ្វើយ៉ាងដូចម្តេចដើម្បីដោះស្រាយបញ្ហានេះ?


ដំណោះស្រាយ
១.  ចុច Mouse ខាងស្តាំ នៅលើ Field ដែលយើងចង់គណនា
២. ជ្រើសយក Field Calculator
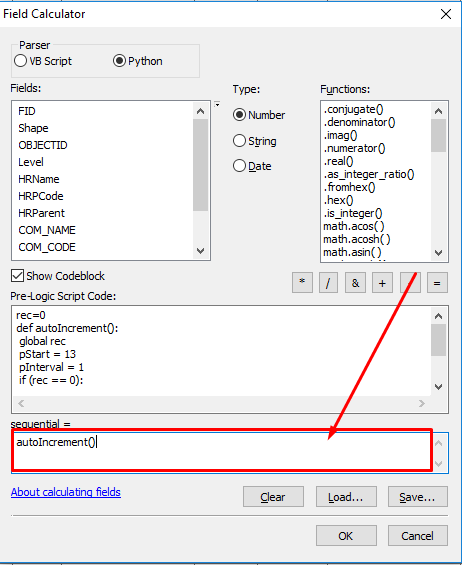
៣. ចុច Tick នៅលើ Python
៤. ចុច Tick នៅក្នុងប្រអប់ការេ Show Codeblock
៥. Copy text និង Past នៅក្នុង Pre-Logic Script Code


rec=0
def autoIncrement():
global rec
pStart = 1  
pInterval = 1
if (rec == 0):  
 rec = pStart  
else:  
 rec += pInterval  
return rec


៦. Copy text និង Past នៅក្នុង Pre-Logic Script Code ដែលមានទំហំតូច

autoIncrement()


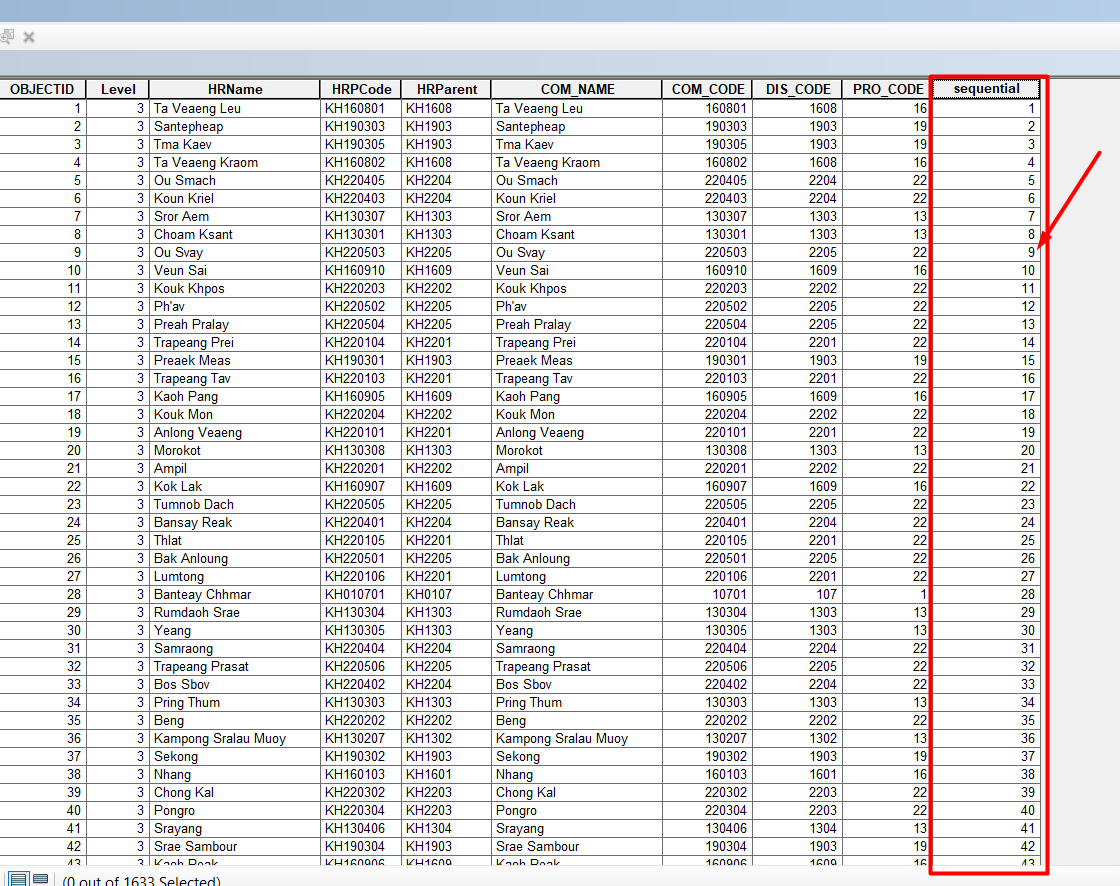
៧. រួចចុច “Okay” លទ្ធផលនឹងបង្ហាញនៅខាងក្រោម៖


ចំណាំ៖
ប្រសិនអ្នកមិនចង់ ចាប់ផ្តើមពីលេខ ១ ទេ ហើយហើយអ្នកចង់ចាប់ផ្តើម ពីលេខផ្សេងនោះ។
សូមអ្នកកែ ត្រង់  pStart = 1  ទៅជា  pStart = (លេខដែលអ្នកចង់ផ្តើម)
Ex:  pStart = 1 ទៅជា  pStart = 10

របៀបប្តូរអក្សរដំបូងឱ្យក្លាយទៅជាអក្សរធំ នៅក្នុង Field ដោយប្រើ Python​ ក្នុងកម្មវិធី ArcGIS

If you letters and words are all uppercase or lowercase in a field, and you want to capitalize the fist letter of each word. We have some straight-forward Python code just for you.

And all you'll need is the field calculator in ArcGIS(ArcMap) combined with a bit of Python.

This step-by-step guide will help you get started:


What this Tutorial will accomplish

We will simply take any field, and change the first character to a capital letter. The other letters in the word will be lower case.

For Example:

  • BANTEAY MEAN CHEY will become Banteay Mean Chey
  • Banteay mean chey will become Banteay Mean Chey

Capitalize Words Python ArcMap Tutorial

STEP1: Create a new text field called 'Eng_Name'. This text field will be used to store the capitalized words. Make the text length property large enough to hold all of text from the other field.

Now, there should be a new text field called Eng_Name in your table:


STEP2: Right-click the new field 'Eng_Name'. Select the 'Field Calculator' option.


STEP3: Select the Python radio button. In the expression text box, double-click the field with the existing text field that you want to capitalize the first letter. Type .title() after the field and press OK. Type it exactly like that. Here's an example of the field calculator code block:

See the result - a new field with capital letters:


If you are getting an error, try to the following:
  • Run this python code block by selecting the records first.
  • Do not capitalize .title() with a capital 'T'

Capital Letter Results with ArcMap and Python

 Python has a simple solution to capitalize the first letter in a text field.

You can also convert strings to all lowercase in a text field using the .lower() property. The .upper() returns a copy of a strong with all the cases characters converted to uppercase.

From titles to lowercase to uppercase...

Use these handy python string operators as huge time-saves for your big data sets.


Resource : GISGeography

ចំនុចទាំង ១០ ក្នុងការឆែកមើលទៅកាលPrint នៅក្នុង ArcGIS

Turn good maps into great maps by running some final checks before you print it out. In this blog I’ve put together a list of 10 things to check before printing from ArcGIS that ensure that my maps are as good as they can be.

By way of an overview I’ve provided an annotated reference example map below highlighting the items to check – click on the map to open it full size.


1. Scale Bar and Scale Text

A map scale helps the end user understand the relationship of the map units to the real world. Either a scale bar and/or scale text must be included on all maps unless, of course, the map is not to scale in which case it should be clearly marked. When creating a scale bar, check that the intervals are relevant and useful, avoid unnecessary repetition of intervals and round off numbers to the nearest scale.

2. Geodetic Information

Latitude and Longitude are not unique. Make sure that projection, spheroid and datum information are always included as a minimum. Where possible, include the EPSG code.
 See http://www.epsg-registry.org for more information. For custom projections, full projection parameters should be provided.


3. Locator Map with Extent Indicator

Include a locator (overview) map to show the extent of the main mapped area within a larger region, to provide geographic context. Clearly a locator map is redundant when the main mapped area is continental or global in extent.

4. Legend and Symbology

A legible, uncluttered and easy to understand legend makes it easy for end users to understand the symbology used in the map.
  • You should group points, lines and polygons where possible.
  • Make sure that only items visible in the current map extent are in the legend.

ArcMap 10.1 allows you to do this by using dynamic legends. A good way of checking is to run through each item in the legend and see if all the features on the map can be easily identified.

5. Citations and Audit Trail

Include data source and any copyright information for all layers used in the map. You should also include ‘Audit trail’ information, such as:
  • The date on which the map was produced.
  • The name of the cartographer.
  • The internal file reference for the digital source file.

6. Measured Grids and Graticules

Some tips for making sure that the grid/graticules work well are:
  • Check the interval spacing – avoid having too many tightly spaced grid lines on the maps as it can clutter the map and obscure features. See recommended grid line spacing below.
  • Measured grids should generally be used on larger scale maps.
  • Consider using crosshairs for graticule intersections on larger scale maps.


7. Font Sizes

Make sure that the text across the entire map is legible and avoid using oversized fonts. The table below gives suggested font sizes for Arial text, in upper case.


8. Spell Check

You should ensure that the map is free from typos and spelling mistakes. ArcGIS 10.1 doesn’t have a built–in spell checker, but there are commercial tools available from other companies.

9. Labels

Check if all the labels in the map are clearly visible and required. Using too many labels can result in a cluttered map which can block underlying features and leave the end user confused.

10. Map Orientation

Finally, some cartographers feel that there isn’t a need to include a north arrow on each and every map, mostly due to the fact that the majority of maps are oriented with North ‘Page Up’. However, including a properly-aligned North Arrow can never harm a map, it can only help keep things clear and avoid confusion, so I’d recommend using one.
If you have any great tips of your own to share feel free to post a comment below.


Resource : Exprodat